The set up process

Watch a video
Set up the Standard price band
This is set up for you by default. If you have one set of price that you use for all customers, you just need to enter a price for your stock items.
Things to consider:
- All customers belong to the Standard price band by default.
- All stock items belong Universal price bands.
Open: Price Book > Selling Prices > Prices for Price Band.
- Select the Standard price band.
- Enter a price for each stock item.
Set up Universal price bands
These price bands have a price for all stock items. Set these up if you use more than one price list.
Things to consider:
- A customer can only belong to one Universal price band.
- When a customer is added to a new Universal price band, they are removed from an existing one.
- Every customer must belong to at least one Universal price band. When they are removed from a price band they're automatically added back to the Standard price band.
- Use the Standard price band which has been created by default, for your main price list.
- Use the Maintain Price Bands screen to create additional Universal price bands for each price list.
- Use the Prices for Price Band screen to enter a price for each stock item in each price band.
- Choose which customers receive which prices.
Set up a Limited Price band
Use Limited price bands for promotional or special prices. Here you add the stock items that have a special price and choose which customers receive them. You can also choose whether these price bands are Active and set start and end dates and times. This allows you enter the prices in advance and choose when they come into effect.
Things to consider:
- You can use both Universal and Limited price bands.
- You choose which stock items to add stock items to these price bands.
- Customers can belong to any number of Limited price bands.
- You can chose a date / time period the price band is used in.
- Once a price band has expired, you can activate it again by changing the date / times.
- You can make a price band inactive so it's not in use.
- The price in the Limited price band takes priority over a price in a Universal price band.
- When a customer is eligible for more than one limited price, the lowest price is used.
- When a customer returns goods, the current price is used by default on the return, This may be different to the price on the original order, particularly if you're using time limits on your price bands.
- Make you've selected Enable Limited Price Bands in the settings.
- Use the Maintain Price Bands screen to create your Limited price bands.
- If required, set time limits for the price band and choose whether it's Active.
- Link customers who will get these prices to the price band. This can be all customers.
- Use the Prices for Price Band screen to choose the stock items to include in the price band.
- Enter a price for each stock item.
Set up mark up prices
Use mark up prices to set a selling price based on an items cost price. Here you set a selling price that's a percentage increase on the cost price.
Things to consider:
- Mark up prices are applied to all items in a product group and not by individual stock item.
- Once a stock item has a mark up price, you can't set a price or a discount for it.
- Mark up prices are applied to all customers.
- Choose the product groups that will use markup prices. Use the Markup Prices screen.
- Add the markup percentage.
Foreign currency price bands
You can also set foreign currency prices for stock items. To do this you'll need to set up a currency price band. Only customers using the same currency can be linked to the price band.
If you don't set up currency price bands, then the item price is converted from your base currency.
- Create a price band.
-
Select the currency.

- Link the price band to customers. Only customers using the same currency can be selected.
- Enter the currency price for each stock item.
Importing and exporting selling prices
A quick way to update the prices of your stock items is by importing and exporting them to an Excel spreadsheet via a CSV file.
Tips
If you never want to use Limited price bands, you can turn them off in the Price Book Settings. This makes sure that these can't be created by mistake, and the customer can't be charged incorrectly.
If you've set up a Limited price band for a sale or promotional period, and want to keep the prices to use again at a later date, you can make the price band inactive. When you need to use it again, you can change it to Active and enter new start and end date if required.
If you want to change the price band or discount for a single, customer you can also do this on the customer's account. Every time you add or remove customer from a price band or discount, the Pricing tab on their account is also updated.

Check and validate your prices
Now you've set up your prices, you might want to check a few things:
- Are the prices you're charging making enough profit?
- Are your selling prices more than the cost price?
- Are the total discounts more than the selling price for any items?
Use the Validate prices screen to check whether your selling prices make enough profit, are more than the cost price and there aren't any discounts that result in a negative selling price.
You can run this at any time. Sage 200 prompts you check this each time you change any prices or discounts. Two reports are produced if any of your prices fail the checks.
What do you want to do?
Open: Settings > Price Book > Price Book Settings.
- Click Edit.
-
Select or clear Enable Limited Price Bands to turn these on or off.
This adds a Price Band Type drop down list to the Maintain Price Bands screen.

Note: You can't turn this off if you've already set up Limited price bands. You'll need to delete any Limited price bands first from the Maintain Price Bands screen.
Open: Price Book > Price Bands > Maintain Price Bands.
If you've chosen to use Limited price bands, choose the Price Band Type - Universal.
For universal price bands you can choose how to enter the prices for stock items. Choose from:
- Set as 0.000 - use this if you want to enter a new set of prices. All stock items that are not linked to the standard price band, will be set as 0.00 until you enter a price. IF you want to clear the price of item linked to the STD price, clear the Use STD checkbox. You enter any different prices on the Prices for Price Band or Prices for Stock Item screen.
- Set price to the same as price band - this sets all the prices to be the same as another price band. This is useful if most prices are the same and you only want some to be different. You enter any different prices on the Prices for Price Band or Prices for Stock Item screen.
-
Link prices to the standard selling price - this sets all stock items prices to the same as the Standard price band. All prices are set and updated in the Standard price band.
If you want the price of most items in a price band to be the same as the standard price, then select this here. For items that have a different price, clear the Use Std checkbox on the Prices for Price Band screen and enter a different price.
Open: Price Book > Price Bands > Maintain Price Bands.
Choose Limited as the Price Band Type.
For limited price bands, you can choose;
- Active: A price band must be Active for the prices to be used, even if a current time period is set.
- Time-based: The start date / time is mandatory but you can choose whether to enter a finish date / time.
You can do this in two places:
- Click Link to customers from the Maintain Price Bands screen or
- Open Price Book > Price Bands > Link Customers to Price Band.
When you add customers to a Universal price band, they're removed from an existing price band. If they've not been linked to a different one, then they'll be removed from the Standard price band.
You can't add or remove customers from the Standard price band.
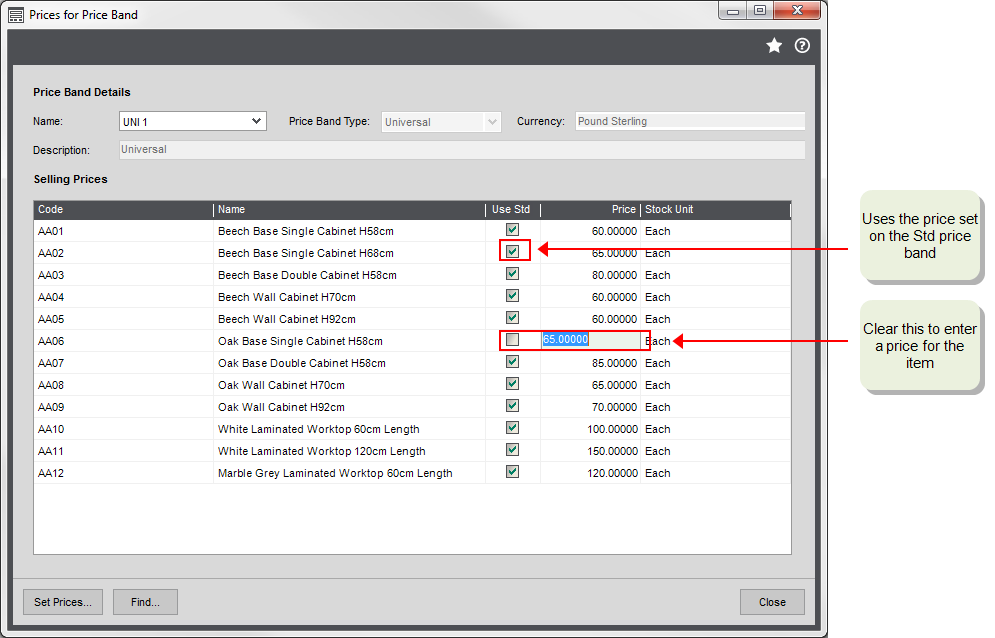
Open: Price Book > Selling Prices > Prices for Price Band.
- Click Add.
- Choose the stock items.
You can choose from all your stock items or filter the list by product group and/or analysis code.
You can do this in two ways:
-
By price band - enter prices for all stock items in a price band.
Open: Price Book > Selling Prices > Prices for Price Band.
Enter the price for each item in the Price column.
Click Set Prices to
- Make all prices zero.
- Make all prices the same as another price band:
- Make all prices the same as the Std price band.
To change the price of an item linked to the Std price band clear the Use Std check box and enter the price.
-
By stock item - enter prices for a single stock item for all price bands.
Open: Price Book > Selling Prices > Prices for Stock Item.
Enter the price in the Price column
To change the price of an item linked to the Std price band clear the Use Std check box and enter the price.
Open: Price Book > Selling Prices > Markup Prices.
- Choose the product groups you want to use markup prices.
- Enter the Markup %.
Open: Price Book > Validate Price Book.
Tip: If you check the prices and discounts for all stock items, this can take some time to complete.